Wow, what a beast........
Updated:
22-Dec-01
Master SUB Woofer with ETON 12/680/60 HEX
Genesis of the SUB
This idea was born, when I was trying out my new PC Function generator in combination with the digital scoop. I wanted to plot an impedance curve of my loudspeaker system, to see what load it was showing to the tube amp. By doing so, I noticed that the active Sub woofers, which are an integrated part of my speakers system, refused to give any audible output below 35Hz and already start rolling off below 45Hz. Grrrrrr, I have been used to large (yes, really large, hehehe) Transmission Lines, going under 20Hz. Ofcourse I noticed before, that the real deep octave was missing, but now I was confronted very directly with it. So what do you do in a case like this? I did the obvious thing for a real Audi Hobby-ist: I decided to construct a MASTER SUB Woofer, to only support the last octave with a power full low bass, dry and undistorted it should be.......
The first decision was already the best: I contacted Tony Gee (check his great Loudspeaker WEB Site at : http://home.hetnet.nl/~geenius/index.html ) for some advise and he explained me, that a sealed construction would give the tightest BASS and best impulse response. Q of the enclosure had to be 0.5. With modern SUBWOOFER Amplifier modules, it is possible to correct the last octave with a bass lift. This normally compensates the roll off below the Fb of the enclosure. There is a down side ofcourse, as there is no such thing as a free lunch: The total sound pressure, where the driver is still working in the linear area, will be much lower than expected from the datasheet! Therefore a really powerful (overkill) Bass Chassis must be selected to full fill this at reasonable sound levels. Tony even sent me a nice excel sheet to calculate every thing and this is what came out:
Master SUB WOOFER Project Description:
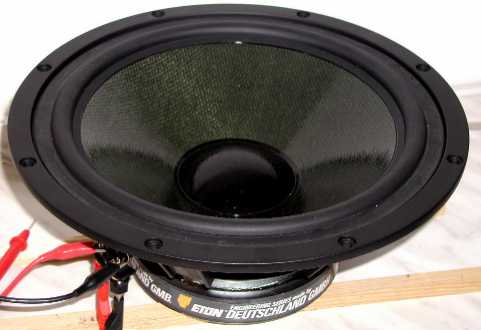
Driver:
ETON 12-680-60 HEX, a truly high end power bass unit, with HEXACONE Cone material, making
this the stiffest woofer available.
Wow, what a beast........
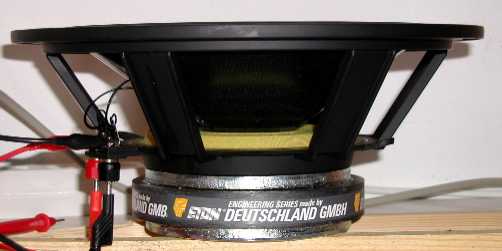
Thanks to the large linear hub (+/-12mm) this steam machine is extremely suitable for driving below the Roll off. Remind that with a roll off in a closed construction at Q=0,5 the roll of is very slow, 3-4 dB / octave or 6dB from 40Hz to 20Hz. This fits great with the Subwoofer Amplifier Filter Characteristics.
Enclosure:
38mm MDF, Matrix construction, 65x65x45cm (so I will use it as little table next to the
sofa, hahaha!) net 98 Liter, weight aprox 90 kg (!!!) this little baby will not move when
producing sound, I guess..... This will be part of the furniture, so I will have it
finished in polished piano black and round corners of the enclosure.
Subwoofer Amplifier Module: The
Thommessen SW2.0
These days, there is no need to build your own amplifier for this purpose, specially
the wide variety of filters in Todays Amplifier modules, make them extremely suitable for
this purpose. I mean in specific, the variable filters, bass lift and the variable Phase.
With the last one, you can bring the subwoofer in phase with the rest of the speakers
(well at least for the listening position area). All this can not be done with the
standard bass section in your loudspeakers........
I choose for a local brand: Thommessen. They just introduced a new module with latest technologies: the SW2.0
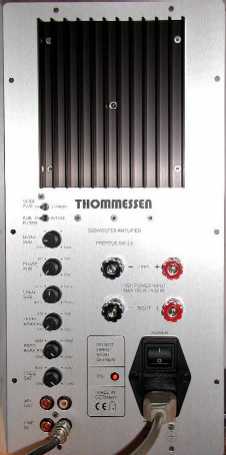 Main Specifications:
| Power | 175 Watt @ 4 Ohm Max Power |
| Damping | 400 |
| S/N ratio | 92dB |
| Filters | Low Pass filter: Butterworth 3rd order
40-110Hz Subsonic filter: Butterworth 3rd order 12Hz Bass lift filter : +6dB starting at 20-40Hz Phase control : 0 - 270 degrees |
This will result in a SUBWOOFER, straight from 20Hz - 60Hz with a soundpressure of aprox 100- 105dB
Looks good, he? Well, next week or so, I expect to receive all the materials (including the MDF panels), so I can start constructing.
Update December 1st
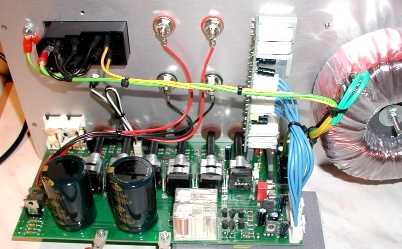
This week, I received the Amp module and the Woofer. I changed the pictures above for homemade pictures. Just check below the pictures of the Amp Module I made during my test session. I was pleasantly surprised to see that this Germany Made product was crafted with so much care. It looks very solid and high quality components are used. My only doubt was the power supply with only 2 x 10.000 uF Filter Cap. In the measurement pictures below, you will see that this will cost you quit some power. I thirst thought to ad 2 times 100.000 uF for example, BUT, as I tried to squeeze the AMP at full power and 2.4 Ohm Load, the fuses blew out !!!! Now I am not so sure any more, if I need the extra capacitors...... May be I should be happy with undistorted 125 Watt at 4 Ohm.......
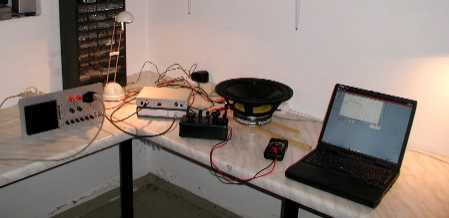 On the picture right, my
good old test and measurement equipment: The Digital Scoop and the PC Function Generator.
How have I ever been able to DIY without these two fine pieces of LAB help????
On the picture right, my
good old test and measurement equipment: The Digital Scoop and the PC Function Generator.
How have I ever been able to DIY without these two fine pieces of LAB help????
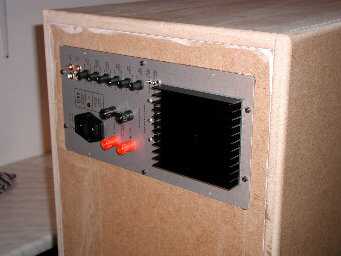
Below an overview of the backside (it is hard to speak from the "inside" isn't it??). To be honest, I could not make this my self for the 598 DM I paid. Just image all the work.... No. I am glad that these subwoofer modules are well available these days !

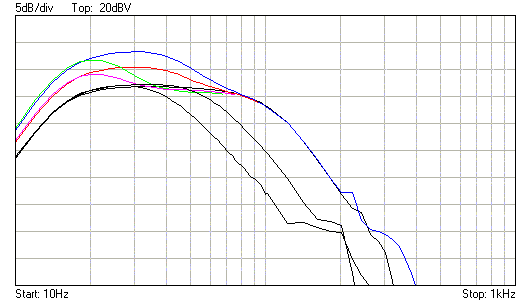
Nice overview of all the possible Filter functions !!!! Below the graph of a selection of the transfer characteristics. As this is linear adjustable, these curves actually represent the outer boundaries and the middle curve. I am sure I can find the right curve to fit, or compensate I must say, the final frequency response of the Box itself
Measuring the SW2.0:
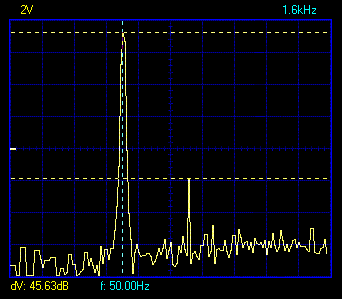
Ofcourse I am not the type of DIY, who buys a module, believes the specs and just builds in the Module. Oh no, no way, it is much more fun to do some measurements and know for sure, what you actually have in your hands! I set up a simple test sequence; PC Sinewave generator at 30Hz; this is a realistic low frequency for this application. I checked first the distortion. Well with only a 3rd at -45dB (ca 0,5%), I foresee no problems
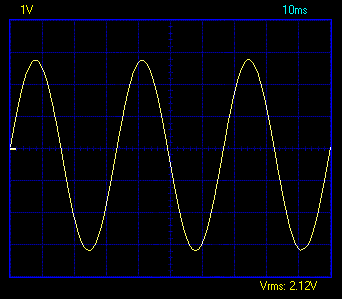
below is the just not distorted sinewave at a load of 3,6 Ohm. Why 3.6? I had 3 resistors of 1.2 in the drawer, hahaha! But seriously, it represents real life speakers as well I guess. The Voltage is based on a probe with a 1:10 division, so actually the Vout RMS was 21.2 Volt, resulting in 125 Watt RMS, Pure undistorted power. NOT BAD ATT ALL !!
Below here a more detailed picture with 30Hz sinewave at a load of 100 Ohm, so this should be considered as the maximum output voltage BEFORE CLIPPING. A Vout of 27,2 Volt RMS should result theoretically in 205 Watt RMS......
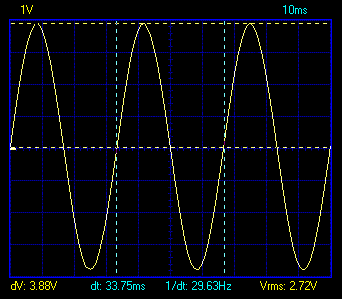
...Isn't it than ??? No it isn't. At a load, current is drawn and depending on the size of the transformer (225 VA in this case) and the Filter CAP's (2x10.000 uF) the maximum available Voltage will drop. Just look at the picture below: This is what happens with the same signal at the input, but now with a 3,6 Ohm load. The supply Voltage drops with 9.1 Volts !! This will result in 6V RMS less output: 78% of open AMP, (150 Watt RMS), OOPS. A positive aspect is by the way the damping factor. When playing at for example 20 Volt RMS with no load, the Output dropped only with 0,5dB (!!) when a load of 3,6 Ohm was applied. This is 95% of the output voltage leading to 90% of the power. VERY GOOD I must say for such a load switch. Most amplifiers go much deeper !
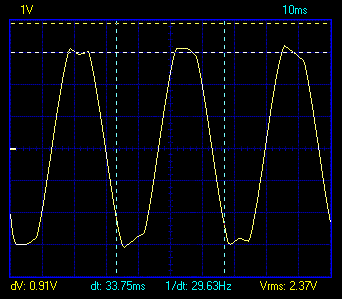
In the picture below you will see what happens with the same signal at the input, but now with a 2,4 Ohm load. The supply Voltage drops with more than 12 Volts !! This will result in 8,5V RMS less output: 69% of open AMP, and than...... PATSSSS, the fuses blew out. Ahem, this was probably a bit too much for the amplifier. I can imagine: with 22 Volt RMS at the output and 2.4 Ohm, it had to deliver almost 10 ampere and deliver 200 Watt. May be I should not increase the Filter Caps. The fuses will probably keep on blowing out.........

Conclusion???? Yes: This is a very good and stable amplifier to drive the Bass speaker. It can deliver enough power and more important, it stays very stable when the load switches. Just one thing: do not expect to have more than 20V RMS out and the bass will be tight. Drive it above and it will become distorted and weak.....
With an Output 20 Volt RMS at 8Ohm this is 50Watt, AHAAAAAAA !!!! This happens to be the maximum power I can supply to the ETON at 20Hz - 30Hz in order NOT to drive the speaker out off the linear area and to deliver 100dB soundpressure. Well, a perfect MATCH between these 2 fine components. The only thing is now to get them built in the enclosure....
I am waiting for the MDF panels..... so you and I have to wait for next construction details and story.
Update December 13st
So, finally I found some time to pick up the MDF panels. Of course I immediately started the construction !! For my favorite X-Mass songs, I need some more foundation..... I have not so terribly much to show today, but I will just very regularly update this page, so it will be a real series. I started with drawing off all the holes for the inner panels, the speaker unit and the amplifier module. Tomorrow, I can start jig sawing and cutting out the front frame for the speaker and the amp module. The basic cabinet is already there, ahem, just 5 panels GLUED together with Patex Construction Glue. Much better than standard glue. It realizes a better construction than screwing. So you guess, no single screw will find its way in this design !!! only GLUE !
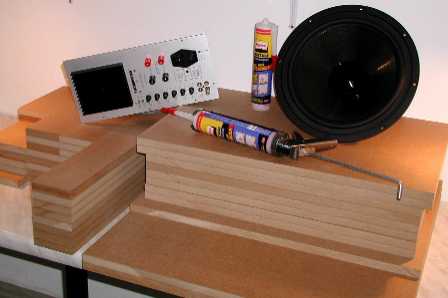 Most
of the ingredients together, more than 80kg's of MDF !!!
Most
of the ingredients together, more than 80kg's of MDF !!!
Nothing will be
screwed. Only Patex Construction Glue is used.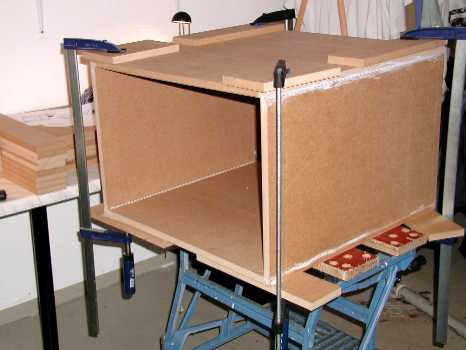
Update December 17st
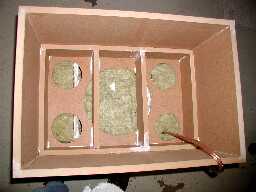
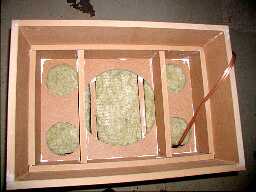
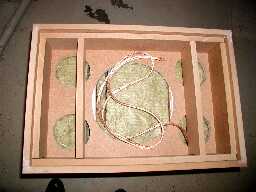
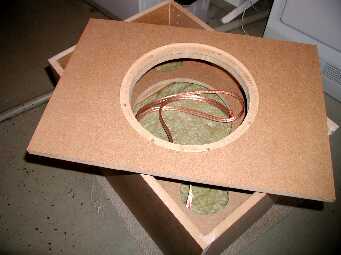
Juts imagine, you just take this BOX (as on the picture above) and you put an baffle with a loudspeaker at the front..... Great Bass will be the result, a real BOOM BOX ! No, we need to make sure that this construction is as dead and resonance free as possible. Therefore it needs to be STIFF. For that reason the inner of the box is filled with frames (with holes in it to let the air flow freely) every 10cm. The supporting pieces of MDF have 2 functions: to support the frames AND to make the box 38mm thick (in stead of 19mm). This will ensure also the Stiffness (and weight) of the whole construction. The damping material is not only stopping rest resonance's, but is actually meant to INCREASE the EFFECTIVE volume from the enclosure from 100liter to approximately 140 liter. This will tune the whole system to a Q of 0,5..... Just have a look on how the box get "filled" with the frames and the damping material:

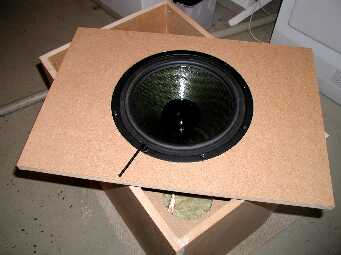
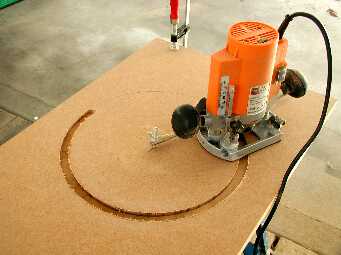 Afterwards, started to prepare the 38mm thick front baffle. This is the
kind of work I like! This will make or break the final appearance, so again, I use the
right tools and took my time...... Next will be the same action for the back panel (where
the amplifier fits in) and than, MUSIC ! I am still thinking on how I will be finishing
the edges, round? or elliptical? and may be a small relief around? We will see!
Afterwards, started to prepare the 38mm thick front baffle. This is the
kind of work I like! This will make or break the final appearance, so again, I use the
right tools and took my time...... Next will be the same action for the back panel (where
the amplifier fits in) and than, MUSIC ! I am still thinking on how I will be finishing
the edges, round? or elliptical? and may be a small relief around? We will see!
Almost finished ........
Update December 23rd
Today's program was the final assembly and finish of the subwoofer. Not much too say, other than that I spent a few hours in my garage, under a thick layer of MDF dust, but the result was a very smooth finish of the enclosure. I will not paint the box right now; it is simply too cold now!! I will wait till spring and some higher night temperature's...... So lets check the final pictures ----------------->
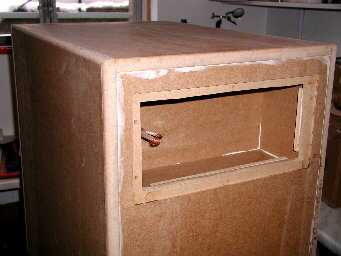
The Amplifier has a little enclosure
in the box itself. You can also see the rounding of the edges. It makes the enclosure look
much better
How does it sound???? Of course I am a bit biased, but this is truly, the most dry and cleanest bass I have been able to produce from all projects I ever built. The ETON speaker unit is really working as a piston, just moving lots of air. The bass is powerful with high pressure, but never any boom or long decay. When it stops it stops, very very dry. I am so glad I refrained from using Bas Reflex Ports. The correction through the amplifier works just fine and the unit is really able to handle the power needed to produce the necessary soundlevels! The huge amount of control's on the Thommessen Amplifier proved to be indispensable !! Very easy to "tune" the whole system in a great mutual sound stage. You need only help from some one, turning the controls, when you are sitting in the listening position, giving directions .........
Well, it hasn't been cheap, building this subwoofer with the finest materials, but I now finally have the bass foundation I always have been looking for....
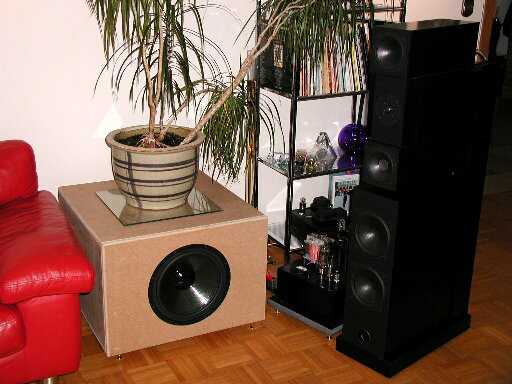
And this is how I integrated the Master SUB in the interior, I admit, it is on the edge, but I think, when the subwoofer is painted black, it will be less profound.
Happy Listening and Building !!!!
Doede Douma
IMPORTANT: The information provided on this page is intended as guide for DIY activities and therefore free to copy and or publish. If any one wishes to use any of the information from my WEB site, please make sure to refer and footnote to my URL Link as source! Doede Douma