Updated:
03-Sep-01
The MU Amplifier tester BOX
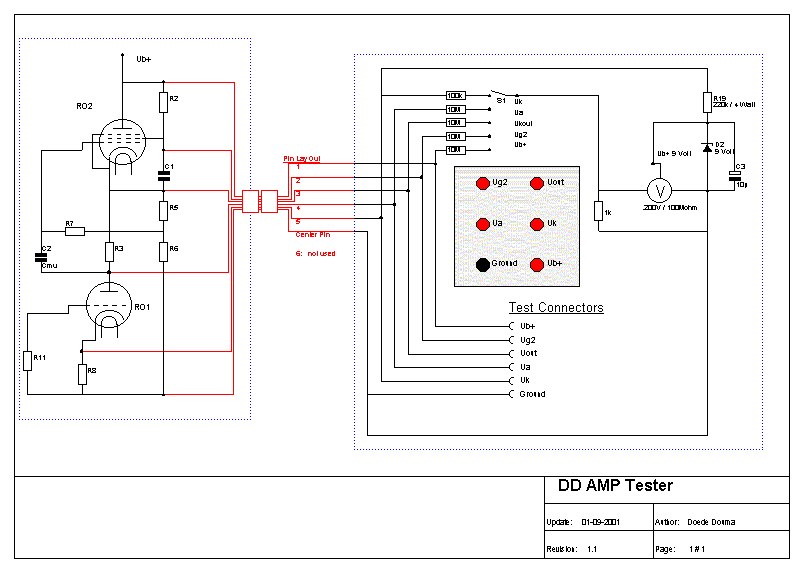
This idea was born, after I wanted to check some voltage inside the amp and not for the first time !! (understatement). I remembered my car..... whenever it is the workshop they plug in some piece of equipment and check every thing. I saw the light! Just imagine, that you have a connector at the back of your amp, you plug in a little black (or grey) box with a few meters of cable. Now, at a convenient place you can check the most important parameters of the AMP, without moving or tilting it. This is easy, just ordered some stuff from the Conrad Catalogue and built every thing together. I decided to do it only for the MU stage. Reason is simple: at the end stage there is this nice mA meter, if this is at the right value, every thing is fine. At the MU stage it is not that simple, more voltages are interacting with each other and deliver the optimum MU-Stage; specially if you change tubes and need a quick check of the operation point. Just turn the rotary switch and follow the values at the small LCD display!
An unwanted EXTRA bonus are the connectors on top of the box. Here you can add extra components or attach probes from the oscilloscope.... I tested the MU stage with a potentiometer of 20k wirewound on the poles Ua and Uout. This is the bootstrap resistor of the MU. When turning the potentiometer you can see the Ua go up. The Uout stays almost the same. This means, that you can change the MAXIMUM Output Voltage of the MU. I tested it with a sinewave generator and the FFT analyzer at full power. By turning you could see the d2 and d3 go down !!! also the d3 went quicker down than the d2, very good ! OOPS, now I turned it to far, the d2 / d3 are not decreasing any more, but now the output signal goes down. So a few steps back, and the best compromise was found ! No flipping, no turning of the amp. By the way. The Ua was 185 Volt (now it is 150Volt) and the Ra was aprox 5kOhm. I will write about this tweak later on in the tweak of the weak, when I put a fixed value of the resistor in the amp and listened to it. Total distortion was reduced by a factor 10 ( !!! )
Ok: the techy info below:

This is the circuit, not really rocket science eh?
This is how the grey box looks like, Just a very handy tool. The cable is a special control cable, very flexible and the wires inside are numbered for ease of construction.
There was still some space at the back of the Amplifier to mount the connector. There is also a CAP to protect access to any dangerous voltages. At the right you see the (labeled) connections to the respective points in the MU stage
The MU-Stage tester in action !!!!
IMPORTANT: The information provided on this page is intended as guide for DIY activities and therefore free to copy and or publish. If any one wishes to use any of the information from my WEB site, please make sure to refer and footnote to my URL Link as source! Doede Douma