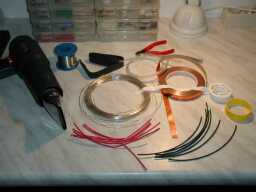
Here are all the ingredients you will need to make these cables:
- Heatgun
- Heat shrink tube
- Silver wire
- Transparent plastic tube
- Copper foil tape
- Teflon tape
Updated:
13-Dec-01
Doede's Other Audio
Projects...
Who said silver cables were expensive? I did! that was some time ago, before I had the tip (yes yes, who else?) from audio mate Triode Dick to use 0.8 mm silver hard core wire, ordered at a silver supplier, therefore much much much cheaper than at the audio shops !!! I paid for 40 meter wire aprox 100$, not bad I guess...
I am not ready with the long interlinks between Pre Amp and Mono Blocks (pffff 10 meter long !) yet, but I already made the speaker cable in BI-Wiring. The results were one of grace... no special effect, no different sound or so. The most interesting was the fact that the music became very homogeneous! very well balanced. This ofcourse helps the total musical image to reproduce. The silver sounds also smoother than the standard copper cable; same result as changing rectifiers I would say...
Again, one of those little steps into the direction of musical sound reproduction you won't come back from. And you know, with many little steps, you make one giant leap ! With this wire, you can hardwire your amplifiers and build signal and speaker cables as well !!
The pictures below describe the process:

Here are all the ingredients you will need to make these cables:
- Heatgun
- Heat shrink tube
- Silver wire
- Transparent plastic tube
- Copper foil tape
- Teflon tape

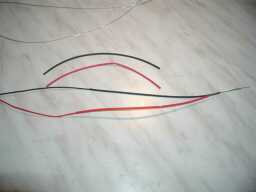
The first step is to shrink the small tube round the wires to obtain isolated signalwires.
Use different colors shrink tube for signal plus and minus.
To reduce the capacitance of the cable (that is what we want !) we need to twist the cable in such a way, that the signalwires are not too close. This would increase capacitance dramatically! I created a small xls file where you can calculate this very easy. One way to create the distance, is to twist the wire round a transparent plastic tube, you can buy in every home improvement store. I used 5mm version as best compromise between size of the cable and capacitance. If you try the xls file, you will see that there is not much gain when you use thicker tube.
If the cable will be used as small signal wire, you want to make a grounding shield. As always, there are many ways leading to Rome, but I used self adhesive copper foil tape. This is used for making Tiffany Lamps (another hobby of me...) and can be bought at the typical creative/hobby shops. As these people have no clue of high end audio, the price is very reasonable (I paid 15$ for 30 meter 12 mm wide tape). The process is simple: tightly wrap the cable in the copper foil and solder one lead (yes only ONE !!) to the copper. This lead will be connected to the ground of your amplifier (internal use) or the shield of the Cinch Plug.
Now the whole cable is wrapped in Teflon tape for isolation purpose. A small piece of heat shrink tube fixes the ends of the cable. I noticed, that the Teflon tape is not very rugged. If your cables are exposed to mechanical stress (stepping on it, riding the vacuum cleaner over it, or worse....) you could consider to put the whole cable in another (wider) heat shrink tube, protecting the whole thing. Looks better as well....
Well, not too difficult eh'? Speaker cables are much simpler, just forget the plastic tube, the copper foil and the Teflon tape. Just twist the isolated wires. It looks a bit like Kimber Cable now...
Update December 13st
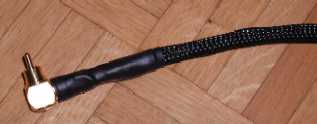
The above construction is actually meant for internal wiring. If you want to make an Interlink, you can give the cable a nice finish with the special socket you can see in the picture below. This variable diameter flexible "tube" you can buy at www.dienadel.de It gives protection and looks MUCH BETTER than the finish with only the plumbers Teflon tape....... I used 90 degrees cinch, this gives a more natural (NEWTON !!) support to the cable as it is connected to the amplifier.....

An example of the possible
finishing as Interlink
Listening Impression:
I have finally upgraded my whole system with the silver cables / interlinks. Specially the interlinks between the PRE-AMP and Mono Blocks were quite a job. They are 10 meters long, ahem.... But now everything is playing for some time and I like to share my listening experience with you here. The comparison is made against Oehlenbach silver/copper cable. This was used between the amps as well between the DAC and PRE AMP.
I have been listening to all kinds of styles of music and what intrigued me, was the homogeneity of the music reproduced by the silver cables. It is hard to describe, but compared with the other cables, the highs are part of the total. In the old cables the highs were playing as a "separate" sound. Again hard to describe and understand, but if you hear it, you know it and there is NO WAY BACK. These cables creates a great sovereign sound. Of course the silver effect: nicely transparent soundstage and honey sweet sound, was there 200% !!!! But the other "effect" was much more interesting, because you CANNOT achieve that by changing capacitors or tubes...... this effect I exclusively heard with the pure silver cables. An enrichment for the whole sound so to speak. I am very enthusiastic. This difference I rate almost the same in value (not in sound effect !!) as the swap between a Chinese 300B and for example the KR300B......... Big time value so to speak
Greek Input on Silver Cable making:
I received this mail from Evangelos Kenourgios, a reader from Greece. He has another (similar) way to construct Silver cables. I cannot comment what would be better, I have had feedback in both directions, but WHAT's NEW ??????? This is audio, isn't it? I like to see options and new possibilities, let every one decide for him (or her) self. I just copy the text without additions or deletions....
Hi again Doede,
I just read you article on constructing DIY silver cables and, since I also make my
I/C and speaker silver cables myself, I would like to contribute with my own experience. I
must say that the idea of this technique is based mainly on Allen Wright's ideas presented
in his "Super Cables Cookbook". I use much thinner solid silver wire than you:
for the interconnects I use 0.3 mm wire (more difficult to work with); for speakers, I use
again 0.3 mm for the highs and 0.5 mm for the lows (bi-wiring as you guess). This
configuration is based in Allen wright's claim that the thinner the wire the better the
sound. I'm using quite sensitive loudspeakers (95 dB) with a pair of 300B monoblocks (7W),
so the current is not large for such a thin wire; in fact, while I was experimenting with
cables, I had used wire wrap wire (0.25 mm) for the whole speaker (no bi-wiring) and was
performing fine. The technique I'm using is a little different than yours: First of all, I
always polish the silver wire before any further process. For this, I cut the wire to the
desired length and I pass the whole piece with some silver polishing cream. It helps me to
keep the wire straight without touching anything, tightening it in two vices, one mounted
on my desk and the other on a chair loaded with some heavy items, so that I can always
adjust it to the length I have in hand (quite complicated may sound but easy and works
fine). After that, I wipe the wire with several passes of cotton, until no blackish
residue is left on the cotton. The idea of high luster polishing the wire is that the
outer surface of the wire is covered
with oxides; as the signal mainly passes through the outer surface of the wire (skin
effect), it has to travel through pure metal and not some oxides, which might work as
semiconductors and degrade the signal. Immediately after that, I coat the wire with
urethane so that the polished surface doesn't come in contact with air and reoxidize. To
accomplish this, I use an urethane spray and a piece of cotton. I spray an amount of
urethane on the cotton piece until is moistened well and I give with this two or three
quick passes over the wire (urethane dries quickly and, when it dries, it becomes sticky -
fibers of cotton can adhere to it). After this stage, I cover the entire length of the
wire with Teflon (plumber's) tape, as this is considered an excellent dielectric. I attach
one end of the tape to one end of the (still tightened) wire and I run the tape along the
entire length of the wire to the other end; after that, I twist it around the wire with my
fingers. Next step is to pass the Teflon covered wire through a piece of heatshrink
tubing. That's the trickiest part of the whole process, since the thin wire is very
flexible and the Teflon prevents it from sliding into the tubing. So, I use a thin steel
wire to make a first pass through the tubing and then I draw the silver wire using this
steel wire, followed by heatshrinking the tubing. For shielding the interconnects, I use
copper braid, which I can find in different widths. This is also a little bit tricky: I
use a piece of aluminum rod which I pass through the copper braid tubing and then I
draw the twisted pair of wires.At last, I pass the braided twisted pair through a piece of
clear heatshrink tubing of appropriate diameter and heatshrink the tubing. This gives also
a nice look on my interconnects. Finally, I solder
the RCA connectors, soldering the copper braid only at one end (input) and the work is
done. Sorry, but I have no photos to show the whole process. I think the
description is quite detailed.
I think your site is excellent. I have saved most of the pages and I'looking for some
spare time to read them.
Best regards,
Evangelos Kenourgios
I (Doede) still have 2 comments:
IMPORTANT: The information provided on this page is intended as guide for DIY activities and therefore free to copy and or publish. If any one wishes to use any of the information from my WEB site, please make sure to refer and footnote to my URL Link as source! Doede Douma